28. Developing your own agents
By now, you should be very familiar with the concept of agents. You have interacted with them via commands and messages throughout this handbook, but what exactly is an agent?
If you lookup the Wikipedia entry for a software agent, you’ll find:
The term agent describes a software abstraction, an idea, or a concept, similar to object-oriented programming terms such as methods, functions, and objects. The concept of an agent provides a convenient and powerful way to describe a complex software entity that is capable of acting with a certain degree of autonomy in order to accomplish tasks on behalf of its host. But unlike objects, which are defined in terms of methods and attributes, an agent is defined in terms of its behavior.
retrieved 8 September 2019
In this chapter, we take this somewhat abstract concept and crystallize it by developing a simple agent. While the idea of writing your own agent might sound daunting at first, you’ll soon see that it is actually quite easy!
28.1. Unet agents
Agents are the basic building blocks of the UnetStack. They exchange messages, provide services and implement protocols. While what is expected from a well-behaved agent is quite demanding, most of the necessary core behaviors are already implemented for you by the
UnetAgent
base class. All you need to do is to extend it, and add in a little code to teach the agent what you want it to do.
| While you have the option of writing agents in Java or Groovy (or any other language running on the Java VM), we recommend writing agents in Groovy, as Groovy agents tend to need less biolerplate code and are more readable and maintainable. They are also easier to test as Groovy classes can be dynamically loaded from source, without having to pre-compile them. However, if you are already an expert in Java and prefer to use it, you’re welcome to do so. |
The basic skeleton of a Groovy agent looks like this:
import org.arl.fjage.*
import org.arl.unet.*

class MyAgent extends UnetAgent {

  @Override
  void setup() {
    // this method is called when the stack is initialized
    // register services and capabilities that you provide here
  }

  @Override
  void startup() {
    // this method is called just after the stack is running
    // look up other agents and services here, as needed
    // subscribe to topics of interest to get notifications
  }

  @Override
  Message processRequest(Message msg) {
    // process requests supported by the agent, and return responses
    // if request is not processed, return null
    return null
  }

  @Override
  void processMessage(Message msg) {
    // process other messages, such as notifications here
    // if a message is not interesting, it can be safely just ignored
  }

}
While you don’t strictly need the
@Override
annotations, it is a good practice to use them whenever you are overriding a method from a superclass. The annotation tells the compiler that this is what you intend, and so if you make a typographical mistake and type in a wrong method name (one that doesn’t exist in the superclass), the compiler will warn you.
If you do not need any of these methods, you can skip the definition as the base class provides default implementations. There are a several other methods that you can override to customize your agent, but these are less commonly needed and so we’ll skip them for now. You’ll come across them later.
If you happen to be already familiar with the
fjåge agent lifecycle
, you may wish to note that the
setup()
method is called from the
init()
method of the agent. The
startup()
method is called from a one-shot behavior scheduled during initialization. The
processRequest()
and
processMessage()
methods are called from a message behavior added during initialization.
|
28.2. Groovy echo daemon
It’s best to illustrate with a simple example.
Let’s develop an
echo daemon
that will respond to each incoming
echo request
datagram with an
echo response
datagram containing the same data as the echo-request. We need a way to identify which datagram is an echo request, as we don’t want to be echoing datagrams intended for other agents or for the user. We do this by defining an echo request datagram as any datagram with protocol
USER
(recall that protocol numbers from
USER
onwards are available for your own applications to use). We do not want the response to use the same protocol, otherwise our daemon (running on the source node) could get confused and echo the response, which would in turn be echoed again by the destination node’s daemon, ad infinitum. So we use protocol
DATA
for the echo response datagram, as this protocol is intended for generic application data.
Here’s our daemon:
import org.arl.fjage.*
import org.arl.unet.*

class EchoDaemon extends UnetAgent {

  @Override
  void startup() {
    // subscribe to all agents that provide the datagram service
    subscribeForService(Services.DATAGRAM)
  }

  @Override
  void processMessage(Message msg) {
    if (msg instanceof DatagramNtf && msg.protocol == Protocol.USER) {
      // respond to protocol USER datagram with protocol DATA datagram
      send new DatagramReq(
        recipient: msg.sender,
        to: msg.from,
        protocol: Protocol.DATA,
        data: msg.data
      )
    }
  }

}
Let’s walk through the above code:
-
Our agent does not provide any formal services or capabilities, so we we skip the
setup()andprocessRequest()methods from the skeleton. -
The
startup()method looks up all agents providing the DATAGRAM service, and subscribes to any notifications from any of these agents. These notifications will inlcude theDatagramNtfmessages that are published when datagrams are received from another node. When a notification arrives, theprocessMessage()method will be called. -
In the
processMessage()method, we check for datagram notifications with protocolUSER, and respond to each of them by sending aDatagramReqto the sender of the notification, requesting it to send a datagram with protocolDATAto the node that sent the echo request, with the data copied from the echo request.
That’s it!
Do not get confused between
sender
and
from
, and
recipient
and
to
fields in datagram messages. The
sender
and
recipient
always
refer to the agents that generate and consume the message, respectively. These are entities within a single Unet node. The
from
and
to
are node addresses that tell us which node is transmitting the datagram, and which node is the intended destination.
|
It’s time for us to test this agent. Create a file called
EchoDaemon.groovy
in the
classes
folder and copy the above daemon code into it.
With the Unet simulator or Unet audio running on your machine, you can use your favorite text editor to directly create the
EchoDaemon.groovy
in the
classes
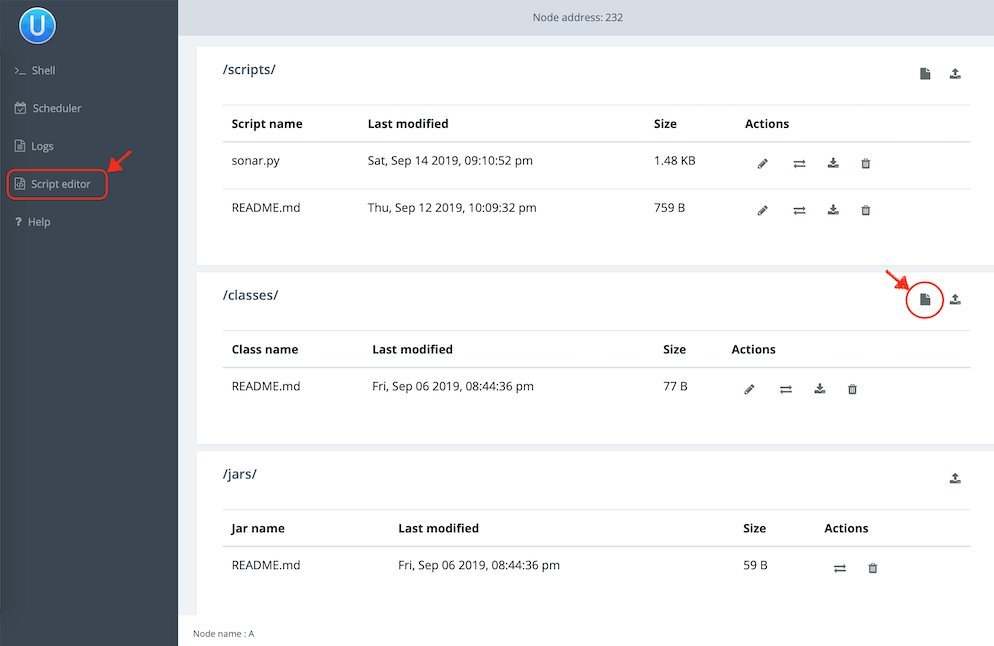
folder. However, a more generic way (that works on modems as well) is to open node A’s shell, select
Script editor
, and use the new file button (
) in the
/classes/
section to create the file:
The same approach can be used to create Groovy scripts in the
scripts
folder.
Now start the 2-node network simulation that we have been using as a testbed, and on node B, load the agent:
> container.add 'echo', new EchoDaemon();             (1)
> ps
statemanager: org.arl.unet.state.StateManager - IDLE
remote: org.arl.unet.remote.RemoteControl - IDLE
rdp: org.arl.unet.net.RouteDiscoveryProtocol - IDLE
ranging: org.arl.unet.phy.Ranging - IDLE
uwlink: org.arl.unet.link.ECLink - IDLE
node: org.arl.unet.nodeinfo.NodeInfo - IDLE
websh: org.arl.fjage.shell.ShellAgent - RUNNING
simulator: org.arl.unet.sim.SimulationAgent - IDLE
phy: org.arl.unet.sim.HalfDuplexModem - IDLE
bbmon: org.arl.unet.bb.BasebandSignalMonitor - IDLE
arp: org.arl.unet.addr.AddressResolution - IDLE
transport: org.arl.unet.transport.SWTransport - IDLE
echo: EchoDaemon - IDLE                               (2)
router: org.arl.unet.net.Router - IDLE
mac: org.arl.unet.mac.CSMA - IDLE
WebGW-5c9c1c68385a388f: REMOTE| 1 |
Create an agent called
echo
based on the
EchoDaemon
class.
|
| 2 |
We see that the
echo
agent is now running.
|
Our daemon is up and running!
Once the daemon is successfully loaded on node B, we can test it from node A:
> subscribe phy                                       (1)
> phy << new DatagramReq(to: host('B'), protocol: Protocol.USER, data: [42]) (2)
AGREE
phy >> TxFrameNtf:INFORM[type:DATA txTime:2809812247]
phy >> RxFrameStartNtf:INFORM[type:DATA rxTime:2811767943]
phy >> RxFrameNtf:INFORM[type:DATA from:31 to:232 rxTime:2811767943 (1 byte)]
> ntf.data
[42] (3)| 1 |
We subscribe to
phy
so that we can see the incoming echo response from the peer node.
|
| 2 | Transmit a physical layer frame containing the echo request and some data. |
| 3 | The data we sent was echoed back. |
We have written our first agent! Was easy, wasn’t it?
Unet modems also have a
classes
folder that accepts Groovy source files or compiled Java/Groovy class files. You can use the web interface of the modem to upload files to that folder. If your code has many class files, you may wish to package them together into a jar archive and place it in the
jars
folder.
|
28.3. Java echo daemon
If you’re a Java programmer and find the Groovy syntax daunting, you might prefer to write your agents in pure Java (at the expense of verbosity and more steps for testing). This is the equivalent Java code below for the Groovy agent we developed in the last section:
import org.arl.fjage.*;
import org.arl.unet.*;

public class EchoDaemon extends UnetAgent {

  @Override
  public void startup() {
    // subscribe to all agents that provide the datagram service
    subscribeForService(Services.DATAGRAM);
  }

  @Override
  public void processMessage(Message msg) {
    if (msg instanceof DatagramNtf && ((DatagramNtf)msg).getProtocol() == Protocol.USER) {
      // we got an echo request!
      // respond with a protocol DATA datagram
      DatagramNtf ntf = (DatagramNtf)msg;
      DatagramReq req = new DatagramReq(ntf.getSender());
      req.setTo(ntf.getFrom());
      req.setProtocol(Protocol.DATA);
      req.setData(ntf.getData());
      send(req);
    }
  }

}
In Java, you’ll first need to compile the Java code. Create a
EchoDaemon.java
file with the above contents. To compile it, you’ll need to have fjåge and unet-framework jar files on the classpath:
$ javac -cp lib/fjage-1.8.0.jar:lib/unet-framework-3.2.0.jar EchoDaemon.java
You should now have a
EchoDaemon.class
file which you copy to the
classes
folder. To avoid duplicate classes, remember to first delete the
EchoDaemon.groovy
file!
Finally, you can run the 2-node network simulator and test the agent, just as you did in the previous section.
28.4. Behaviors
Agents implement most of their functionality with behaviors.
| UnetStack is implemented on top of the fjåge agent framework. fjåge provides a set of standard behaviors for agents to extend. We will explore some of these behaviors in this section, but you are encouraged to read the fjåge documentation at your leisure to learn more. |
We have been implicitly using two behaviors so far. The
startup()
method is called by the
UnetAgent
base class using a
OneShotBehavior
, and the
processMessage()
method is called from a
MessageBehavior
. While you could have manually added these behaviors, the
UnetAgent
base class does this for you, because almost all Unet agents require this.
Let’s next look at a use case for explicitly adding other behaviors. Say we wanted our echo daemon to not respond immediately, but after 7 seconds. How would we do that?
We could of course add a
delay(7000)
in the
processMessage()
method, but that would be a bad idea. If we did that, the agent would sleep for 7 seconds on receiving a request and not process any request from any other nodes! We want the agent to be responsive while waiting, and so do not want to block execution. Instead, we want a behavior that will occur 7 seconds later — this is precisely what a
WakerBehavior
does. Here’s our new
processMessage()
method:
  @Override
  void processMessage(Message msg) {
    if (msg instanceof DatagramNtf && msg.protocol == Protocol.USER) {
      // respond to protocol USER datagram with protocol DATA datagram after 7 seconds
      add new WakerBehavior(7000, {
        send new DatagramReq(
          recipient: msg.sender,
          to: msg.from,
          protocol: Protocol.DATA,
          data: msg.data
        )
      })
    }
  }
The
WakerBehavior
that we add is triggered 7000 ms later, and the echo response is sent in that behavior. Simple!
Behaviors in Groovy use closures to make the syntax easy to work with. If you were writing your agent in Java, you’d need to create an anonymous class and override the
onWake()
method.
|
Go ahead and replace the
processMessage()
method in your
EchoDaemon.groovy
file and try it! In order to reload the agent, all you need to do on node B is:
> container.kill echo
true
> container.add 'echo', new EchoDaemon();
And now you can send an echo request from node A as before and see that the response is delayed by 7 seconds.
You could also send a second request during those 7 seconds, and the echo daemon on node B would process that concurrently. You can send 2 echo requests right after each other, and you’ll see the corresponding echo responses 7 seconds later, but right after each other.
28.5. Parameters
We have seen many agents with parameters that you can get/set. If we wanted to make our echo daemon delay configurable, it would be perfect to expose it as a parameter. Let’s do that next.
With the echo daemon loaded on node B, we see that it doesn’t have any configurable parameters by default:
> echo
<<< EchoDaemon >>>
Let’s add a title, description and one
delay
parameter to our daemon:
import org.arl.fjage.*
import org.arl.fjage.param.Parameter
import org.arl.unet.*

class EchoDaemon extends UnetAgent {

  enum Params implements Parameter {        (1)
    delay
  }

  final String title = 'Echo Daemon'        (2)
  final String description = 'Echoes any USER datagrams back as DATA' (3)

  int delay = 7000                          (4)

  @Override
  void startup() {
    // subscribe to all agents that provide the datagram service
    subscribeForService(Services.DATAGRAM)
  }

  @Override
  void processMessage(Message msg) {
    if (msg instanceof DatagramNtf && msg.protocol == Protocol.USER) {
      // respond to protocol USER datagram with protocol DATA datagram after 7 seconds
      add new WakerBehavior(delay, {
        send new DatagramReq(
          recipient: msg.sender,
          to: msg.from,
          protocol: Protocol.DATA,
          data: msg.data
        )
      })
    }
  }

  List<Parameter> getParameterList() {      (5)
    allOf(Params)
  }

}| 1 | Declare a list of parameters that the agent advertises. We have declared this enum as an inner class, but you could choose to declare it as a separate class if you wish. |
| 2 | Provide a descriptive title for the agent. |
| 3 | Provide a descriptive text for the agent. |
| 4 | Declare the parameter. |
| 5 | Advertise the list of parameters. |
| Note that we had to take 3 steps to add a parameter: declare a list of parameters, declare the parameter, and advertise the parameter. While this might seem like a lot, bear in mind that parameters are much more than just an agent’s class attributes. Parameters can be get/set remotely, even from a different Java VM, different computer, or through a UnetSocket gateway API. |
If you were writing the agent in Java instead of Groovy, you’d need to implement getters and setters for parameter
delay
, rather than simply declare the attribute. This is because Groovy automatically creates the getters and setters for you.
|
Let’s see how the agent looks with parameters. Reload the agent on node B and check its parameters:
> container.kill agent('echo')
true
> container.add 'echo', new EchoDaemon();
> echo
<<< Echo Daemon >>>                      (1)

Echoes any USER datagrams back as DATA   (2)

[EchoDaemon.Params]
  delay = 7000

> echo.delay
7000
> echo.delay = 5000
5000
> echo.delay
5000| 1 | Notice the change in title. |
| 2 | The description is shown here. |
We have changed the delay from 7 seconds to 5 seconds. Go ahead and send a echo request from node A and see that you get a response back in 5 seconds!
If you want to compute parameter values on demand or validate parameters, you can implement getters/setters for the parameter, and they will be called. If you want a read-only parameter, you can declare the attribute as
private
and implement only a getter for that parameter.
|
While our example above uses a static description, the description can also be dynamic. This can be useful if you want to display agent’s status information in the description. To implement dynamic descriptions, simply replace the
description
attribute by a getter
getDescription()
that returns a
String
description when called.
|
28.6. Services, capabilities, and notifications
Most of the agents we have been interacting with, have advertised services, and sometimes, optional capabilities. They also honor requests and publish unsolicited notifications. All of these are quite straightforward to implement, and you can explore some of these features in this blog article on how to implement a simple PHYSICAL service agent (modem driver). We will explore some of these in the next chapter, along with other cool features like finite state machine behaviors and protocol data unit (PDU) codecs.