10. Portals
Although the UnetSocket API provides great flexibility, it requires an application to explicity use the API to integrate with UnetStack. Sometimes you might have devices or applications that talk to each other over a serial cable or a UDP/IP or TCP/IP connection, and you simply want to replace the cable or connection with an underwater wireless connection. Is there an easier way for such simple Internet or serial port applications to communicate over a Unet?
The answer lies in portals. A portal is a transparent connection across the Unet. Data going in through one end of the portal travels through the Unet and emerges from the other end. The interaction with the end points of the portal is via traditional technologies such as UDP/IP sockets, TCP/IP sockets, or serial ports. This enables applications developed to use these technologies to transparently work over a Unet.
| While portals are easy to use, you should bear in mind that applications developed for the Internet or for use over serial ports do not understand the constraints and characteristics of a Unet. Some applications may use bandwidth inefficiently, or expect responses with latencies that are unreasonable for a Unet, and therefore perform poorly. |
10.1. UDP portal
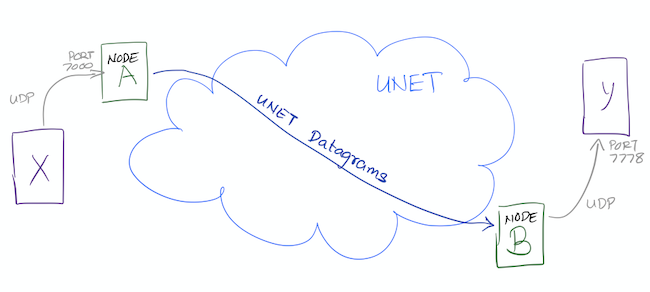
Since UDP is a datagram-oriented protocol, it is easy to map UDP datagrams to Unet datagrams. This is exactly what a UDP portal does, as shown in Figure 6 .
In this example, application X sends a UDP datagram to node A, where a UdpPortal agent listens on UDP port 7000 (arbitrarily chosen port number). The UdpPortal agent converts the UDP datagram into a Unet datagram and sends it to node B. The UdpPortal agent on node B receives this datagram, converts is back to a UDP datagram and sends it to application Y listening on UDP port 7778 (also an arbitrarily chosen port number).
Let us emulate this example with our favorite 2-node network. Fire up the 2-node network simulation, as before:
$ bin/unet samples/2-node-network.groovy

2-node network
--------------

Node A: tcp://localhost:1101, http://localhost:8081/
Node B: tcp://localhost:1102, http://localhost:8082/
Open browser windows for shell access to each of the nodes. On node A, create a UdpPortal listening on port 7000 (since application X will send UDP datagrams to this port) and sending Unet datagrams (protocol 0 in this example, but that can be configured using the
protocol
parameter below) to node B:
> container.add 'portal', new org.arl.unet.portal.UdpPortal(port:7000, peer:host('B'));
> portal
« UDP Portal »

Transparent transport for UDP frames through a network.

[org.arl.unet.portal.UdpPortalParam]
  clientIP = 255.255.255.255
  clientPort = 7778
  dsp = uwlink
  peer = 31
  port = 7000
  priority = NORMAL
  protocol = 0
  reliability = false
The default
port
and
clientPort
for the UdpPortal are arbitrarily chosen to be 7777 and 7778 respectively. You can easily change them during creation of the UdpPortal, as we did above, or later, by setting the relevant parameter.
On node B, create the other end-point of the UDP portal to send the UDP datagrams to
localhost
UDP port 7778, where you will run application Y:
> container.add 'portal', new org.arl.unet.portal.UdpPortal(clientIP: 'localhost', clientPort: 7778);
> portal
« UDP Portal »

Transparent transport for UDP frames through a network.

[org.arl.unet.portal.UdpPortalParam]
  clientIP = localhost
  clientPort = 7778
  dsp = uwlink
  peer = 0
  port = 7777
  priority = NORMAL
  protocol = 0
  reliability = false
That’s it, your UDP portal is set up! Time to test it out!!
To test the UDP portal (and later, the TCP portal), we will use
netcat
or
nc
. If you don’t have this installed on your machine, now would be a good time to go download and install it.
|
Open a terminal window on your machine and set up a simple UDP server listening on port 7778 (application Y):
$ nc -u -l 7778
Open another terminal window and set up a simple UDP client to send text datagrams to port 7000 (application X). Assuming your IP address is
192.168.1.9
, you can do this using the command shown below. Type a text message and press ENTER.
$ nc -u 192.168.1.9 7000
hello (1)| 1 | Type your text message "hello" followed by ENTER. |
In a few seconds, you should see that text message appearing on application Y terminal:
$ nc -u -l 7778                   (1)
hello (2)| 1 | You had already typed this in earlier. |
| 2 | Your text message "hello" appears here. |
The text message went through the Unet to get there!
You may need to use the IP address of your machine (e.g.
192.168.1.9
) for the UDP connection to send the text message, rather than
localhost
. This is because the UdpPortal binds to the default network interface, and not to the loopback network interface.
|
10.2. Video streaming using UDP portal
You can do some cool things once you have set up the UDP portal. Here’s one real-life example:
Say, you wanted to stream video through the Unet. If you have
ffmpeg
installed, you can set up a UDP video client listening on port 7778:
$ ffplay udp://192.168.1.9:7778
and you can stream a video (
movie.m4v
) over UDP to port 7000:
$ ffmpeg -re -i movie.m4v -an -s cif -r 6 -c:v libx264 -b:v 15k -f mpegts udp://192.168.1.7:7000?pkt_size=512
The various flags control the quality, frame rate, and encoding of the video, and the
pkt_size
option controls the size of the datagrams sent.
The
ffmpeg
flags need to be adjusted to suit your Unet (read the
ffmpeg
documentation!). You need to ensure that the links in the Unet can support the data rates needed for this video, based on the flags you select. We have demonstrated real-time video with a high-speed acoustic underwater link with data rates of about 40 kbps.
|
10.3. TCP portal
A TCP portal is set up using the Portal agent. The Portal agent is quite similar to the UdpPortal agent, but provides more flexibility through the fjåge connectors framework. We can use a TCP connector for our TCP portal.
Restart your 2-node network, and on node A set up a TCP portal listening on port 7000:
> container.add 'portal', new org.arl.unet.portal.Portal(7000);
> portal
« Portal »

Transparent transport for TCP/IP or serial connections through a network.

[org.arl.unet.portal.PortalParam]
  delimiters = [10, 13]
  dsp = uwlink
  peer = 0
  priority = NORMAL
  protocol = 0
  reliability = false
  timeout = 1000
On node B, create the other end-point of the TCP portal listening on port 7001:
> container.add 'portal', new org.arl.unet.portal.Portal(7001);That’s it, your TCP portal is set up! Time to test it out!!
Open a terminal window on your machine and connect over TCP/IP to node A:
$ nc localhost 7000Open another terminal window and connect over TCP/IP to node B. Type a text message and press ENTER.
$ nc localhost 7001
hello (1)| 1 | Type in your text message "hello", and press ENTER. |
In a few seconds, you should see that text message appearing on the TCP/IP connection to node A:
$ nc localhost 7000               (1)
hello (2)| 1 | You had already typed this in above. |
| 2 | Your text message "hello" appears here. |
The text message went through the Unet to get there!
The TCP portal is bidirectional, so you can type something on node A, and you should see it appear on node B. The UDP portal in
Section 10.1
can also be set up as bidirectional by carefully configuring the
peer
,
port
, and
clientPort
parameters at both end-points.
|
10.4. Serial portal
Since the Portal agent uses the fjåge connectors framework, it can easily work with any type of connector. Since fjåge provides a serial port connecor, we can easily set up a serial portal on each of your nodes:
> container.add 'portal', new org.arl.unet.portal.Portal('/dev/ttyS0', 9600, 'N81');
Since many modern computers do not have serial ports, you may not be able to test the above code on your computer. If you have underwater modems with serial ports, you’ll need to replace the device name (
/dev/ttyS0
) with the appropriate serial port device name to run this code. You can also customize the serial port baud rate (
9600
) and settings (
N81
).
|
Once you have the serial portal set up on all nodes, you can connect to the node’s serial port using a serial terminal application (e.g.
minicom
) and type text messages just like you did with
nc
during the TCP portal test.