5. Setting up small networks
5.1. Netiquette testbed
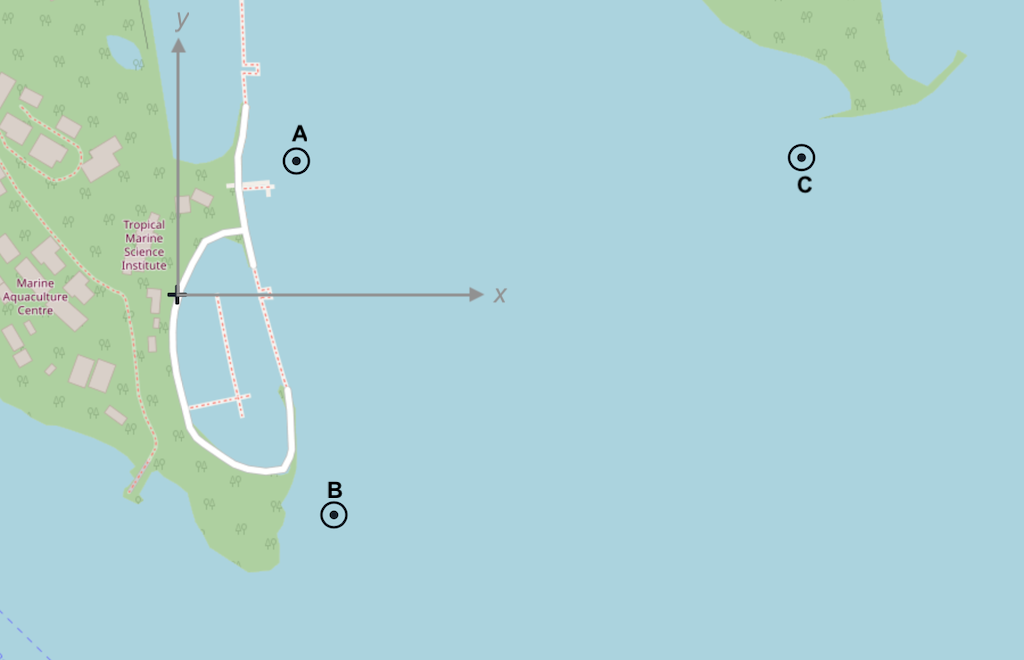
The Netiquette testbed in Singapore is a 3-node network that is deployed at sea (see Figure 4 ), and accessible over the Internet. Nodes A and B are cabled seabed mounted nodes, while node C is a solar-powered buoy. We use a simulated version of the Netiquette testbed to learn how to set up and operate small networks.
To start the simulated network, we simply run the
netq-network.groovy
simulation script:
$ bin/unet samples/netq-network.groovy

Netiquette 3-node network
-------------------------

Node A: tcp://localhost:1101, http://localhost:8081/
Node B: tcp://localhost:1102, http://localhost:8082/
Node C: tcp://localhost:1103, http://localhost:8083/
The port numbers you see in the examples above aren’t particularly special. They are simply whatever were chosen by the developer of the simulation, and can be found in the
netq-network.groovy
script. The only restriction on the choice is that placed by the OS — usually port numbers below 1024 are
reserved
and unavailable to users. Of course, they must also be unique and unused by other applications running on your computer.
|
5.2. Node names & addresses
We start off by checking the configuration of each node:
Node A
> node
« Node information »

Manages and maintains node information and attributes.

[org.arl.unet.nodeinfo.NodeInfoParam]
  address = 232
  addressSize = 8
  location = [121.0, 137.0, -10.0]
  mobility = false
  nodeName = A
  origin = [1.216, 103.851]
Node B
> node
« Node information »

Manages and maintains node information and attributes.

[org.arl.unet.nodeinfo.NodeInfoParam]
  address = 31
  addressSize = 8
  location = [160.0, -232.0, -15.0]
  mobility = false
  nodeName = B
  origin = [1.216, 103.851]
Node C
> node
« Node information »

Manages and maintains node information and attributes.

[org.arl.unet.nodeinfo.NodeInfoParam]
  address = 74
  addressSize = 8
  location = [651.0, 140.0, -5.0]
  mobility = false
  nodeName = C
  origin = [1.216, 103.851]
All nodes are configured to use 8-bit addresses. Node A has is address 232, node B is 31, and node C is 74. The origin is set to GPS location 1.216° N, 103.851° E. Locations are measured in meters relative to this origin, with
x
axis pointing east, and
y
axis pointing north. The mobility of the nodes is set to
false
to indicate that the nodes are static (for mobile nodes, mobility should be set to
true
).
In the simulated network, all of the node parameters are correctly setup by the simulator. In a real network, you may need to setup each node by manually setting the appropriate parameters. To ensure that the nodes retain the parameters between reboots, once a node is setup, simply run
savestate
on the node. This creates a
saved-state.groovy
file in the
scripts
folder with the saved settings. The settings are then automatically loaded when the node is rebooted.
|
5.3. Connectivity & ranging
Let us first check the connectivity between the nodes:
Node A
> ping host('B')
PING 31
Response from 31: seq=0 rthops=2 time=2507 ms
Response from 31: seq=1 rthops=2 time=2852 ms
Response from 31: seq=2 rthops=2 time=2852 ms
3 packets transmitted, 3 packets received, 0% packet loss
> ping host('C')
PING 74
Response from 74: seq=0 rthops=2 time=2600 ms
Response from 74: seq=1 rthops=2 time=2634 ms
Response from 74: seq=2 rthops=2 time=2737 ms
3 packets transmitted, 3 packets received, 0% packet loss
The connectivity from node A to nodes B and C looks good. What about the connectivity from node B to node C?
Node B
> ping host('C')
PING 74
Response from 74: seq=0 rthops=2 time=2810 ms
Response from 74: seq=1 rthops=2 time=2666 ms
Response from 74: seq=2 rthops=2 time=2742 ms
3 packets transmitted, 3 packets received, 0% packet loss
Looks good too!
| In this simulation, everything checks out nicely. But, in the real world, there may be packet loss to contend with. We will see how to handle those in later chapters. |
We can also check cross-check that the routes from node A to nodes B and C are direct:
Node A
> trace host('B')
[232, 31, 232]
> trace host('C')
[232, 74, 232]
The first trace shows that the datagram originated at node A (address 232), reached node B (address 31), and was sent back to node A. The second trace similarly went from node A to node C (address 74) and back. No hops in between, since our network is fully connected.
We can also make range measurements (in meters) between the nodes:
Node A
> range host('A')
0.0
> range host('B')
371.08856
> range host('C')
530.0323
Node B
> range host('A')
371.08856
> range host('B')
0.0
> range host('C')
616.0877
5.4. Sending text messages
Once we have connectivity, we can of course send text messages from the shell:
Node A
> tell host('B'), 'hello!'
AGREE
and we see the text message on node B:
Node B
[232]: hello!We have already seen in Chapter 2 and Section 4.2 on how to send text messages using the UnetSocket API from the shell, as well as from external applications. Hence we won’t dwell on it here.
5.5. File transfer and remote access
Data is often stored in files. Transferring files between nodes is a common requirement. File transfers and remote access is disabled by default. Let us enable this on node B:
Node B
> remote
« Remote control »

Text messaging and remote command execution service.

[org.arl.unet.remote.RemoteControlParam]
  cwd = unet-3.2.0/scripts
  dsp = transport
  enable = false
  groovy = true
  reliability = true
  shell = websh

> remote.enable = true
true
Now we can send & receive files, and run remote commands on node B. Let’s try it from node A:
Node A
> B = host('B')
31
> rsh B, 'tell me,"hi!"'             (1)
AGREE
[31]: hi!                            (2)
> file('abc.txt').text = 'demo';     (3)
> ls                                 (4)
abc.txt [4 bytes]
README.md [96 bytes]
> fput B, 'abc.txt'                  (5)
AGREE| 1 |
Ask node B to send a "hi!" back to me. The variable
me
is automatically defined to be the source node address during the execution of the shell command when Groovy extensions are enabled (
remote.groovy = true
).
|
| 2 | On node A, we receive a "hi!" after a short delay. |
| 3 |
Create a file
abc.txt
with
demo
as content.
|
| 4 |
List local files to check that we have a 4-byte file called
abc.txt
.
|
| 5 |
Send file
abc.txt
to node B.
|
On the shell for node B, we see the notification that the file
abc.txt
was successfully received:
Node B
remote >> RemoteFileNtf:INFORM[from:232 filename:abc.txt (4 bytes)]
Although we demonstrated file transfers between nodes with the simulator, all simulated nodes are running on your machine and so sharing the filesystem. When the file
abc.txt
was transferred from node A to B, the same file was simply overwritten, since it was created in the same folder. You could easily verify this by checking the modification time of the file on the filesystem before and after the transfer.
|
You can also use
fget
to receive a file from a remote node, but you have to remember to set
remote.enable = true
on the receiving node:
Node A
> remote.enable = true
true
> fget B, 'abc.txt'
AGREE
remote >> RemoteFileNtf:INFORM[from:31 filename:abc.txt (4 bytes)]
> fget B, 'def.txt'
AGREE
remote >> RemoteFailureNtf:INFORM[RemoteFileGetReq:REQUEST[to:31 filename:def.txt] reason:no-file]
The last command failed to get file
def.txt
, as it does not exist on node B.
When we send commands to execute on a remote node, they are usually silently executed and the output is not sent back. If we want the output to be shown to us, we need to explicity ask for it using
tell
. Since this is often required, we have a simple Groovy extensions shortcut
?
to do this for us:
Node A
> rsh B, 'tell me,node.nodeName'
AGREE
[31]: B
> rsh B, '?node.nodeName'
AGREE
[31]: B
> rsh B, '?ls'
AGREE
[31]: abc.txt [4 bytes]
README.md [759 bytes]
> rsh B, '?1+2'
AGREE
[31]: 3
> rsh B, '?"You are ${me}, I am ${node.address}"'
AGREE
[31]: You are 232, I am 31
> rsh B, '?range '+host('C')
AGREE
[31]: 616.0877
Sometimes we are not interested in the output, but simply want an acknowledgement that the command was successfully executed. For example, if we set the transmission power on a remote node, we want to know that it was set. That can be requested using the
ack
function.
Node A
> ack on
> rsh B, 'plvl -6'
AGREE
remote >> RemoteSuccessNtf:INFORM[RemoteExecReq:REQUEST[to:31 command:plvl -6 ack:true]]
> ack off
5.6. Node locations & coordinate systems
As seen in Section 5.2 , some network nodes may know their own locations. This is useful for location-based routing and other applications. Depending on the application needs, we may wish to use different coordinate systems when setting up a network. There are 4 basic options to choose from:
- No coordinates
-
We do not know or care about each node’s location.
- Local coordinates
-
We wish to work in a local coordinate system, with only relative locations of the nodes being important.
- Georeferenced local coordinates
-
We wish to work in a local coordinate system, with relative node locations specified in local coordinates. The GPS coordinate of the origin of the local coordinate system is specified.
- GPS coordinates
-
We wish to specify the GPS location of each node, without defining a local coordinate system.
When node locations are not accurately known, we can opt not to define any coordinate system. Local coordinate systems are preferred in applications where such a coordinate system can be agreed upon for the entire network. Range computation and localization is easier to do in local coordinates. GPS coordinates are used when node location is important, but a local coordinate system cannot be easily defined (e.g. ad hoc network with no prior knowledge of area of operation).
UnetStack supports all 4 options through a set of simple conventions:
- No coordinates
-
node.origin = [],node.location = []for all nodes. - Local coordinates
-
node.origin = [Float.NaN, Float.NaN]for all nodes.node.location = [x, y, z]is specified as a 3-tuple in meters. The z axis points upwards (with sealevel being considered 0 m, and the half-space underwater having negative z coordinates), but the x and y axes are arbitrarily chosen. - Georeferenced local coordinates
-
node.origin = [latitude, longitude]for all nodes, with latitude and longitude being the commonly agreed origin location.node.location = [x, y, z]is specified as a 3-tuple in meters. The x axis points east, y axis points north, and the z axis points upwards (with sealevel being considered 0 m, and the half-space underwater having negative z coordinates). - GPS coordinates
-
node.origin = []for all nodes, andnode.location = [latitude, longitude, z]where the z axis points upwards (with sealevel being considered 0 m, and the half-space underwater having negative z coordinates).
| The Unet simulator requires a local coordinate system to be defined, and so only local coordinates or georeferenced local coordinates must be used in the simulator. |
In Section 5.3 , we measured the acoustic range between nodes A and B to about about 371 m. We can check this against distance computed from the location of nodes A and B. We first get the location of node A:
Node A
> node.location
[121.0, 137.0, -10.0]
and then compute the distance to it on node B:
Node B
> distance(node.location, [121.0, 137.0, -10.0])
371.0889
We see that it agrees well with the acoustic range!
It is often necessary to convert between the GPS coordinate system and the local coordinate system. To aid in this, UnetStack provides a set of utility functions:
Node A
> gps = new org.arl.unet.utils.GpsLocalFrame(node.origin);   // set origin GPS
> gps.toGps(node.location[0..1])           // local to GPS
[1.217239, 103.852087]                     // GPS coordinates of node A
> gps.toLocal(1.21723898, 103.8520872)     // GPS to local
[120.9994, 136.9999]
> node.location
[121.0, 137.0, -10.0]
The
GpsLocalFrame
class has additional constructors and utility methods to work with GPS coordinates in degrees, minutes and seconds, if desired.